 Relevancy and Engagement
massachusetts.agclassroom.org
Plants Around You
Grade Level
Purpose
Students categorize plants into groups, describe what plants need for healthy growth, and start their own garden by planting seeds inside a cup. Grades 3-5
Estimated Time
Materials Needed
Activity 1: Thinking About Plants
- Variety of plants and plant materials (See Preparation Instruction for Activity 1 for more details)
Activity 2: Growing a Garden
- Master 1.1, 1 per student
- Master 1.2, 1 per student
- 9-10 ounce clear plastic cups with 2-3 drainage holes in the bottom
- Seeds
- Potting soil
- Water spray bottle
- Trays to hold cups or pots
Vocabulary
seed: the part of a flowering plant that contains an embryo within its protective coat and a stored food supply
Background Agricultural Connections
This lesson is organized into a conceptual framework that allows students to move from what they already know about plants and the environment to a more complete and accurate perspective on the topic. To express their prior knowledge about plants, students begin the unit by sorting plants into categories. They also begin thinking about what plants need to be healthy and what comprises a plant’s environment. Students plant a variety of seeds to explore differences and similarities among different types of plants.
After completing this lesson, students will be able to:
- Categorize plants or plant materials into groups.
- Describe needs, such as light and soil, for plant growth.
- Define environment.
- Draw conclusions from a seed sprouting investigation.
View the Plants Around You Lesson Video to obtain background information for the lesson.
This lesson is one of a five part series. See the following titles for related lessons:
- Plants Around You: Students learn about the functions of plant parts and the environment plants need to grow.
- Properties of Soils: Students learn about the characteristics and components of soil.
- Plant-Soil Interactions: Students learn about the function of roots and how water and nutrients move through a plant.
- Plant Growth Affects the Soil: Students learn about how plant growth takes nutrients from soil and how nutrients can be replaced.
- How Does Your Garden Grow?: Students make a plan for a garden.
Engage
Ask students the following questions to begin a discussion and introduce the lesson:
- Do plants have specific parts that relate to their function?
- Do plants have specific needs for healthy growth?
- What is in a plant's environment? Are there living and nonliving things around them?
Explore and Explain
Activity 1: Thinking about Plants
- Begin the lesson by displaying a variety of plants, vegetables, fruits, and grains (see Preparation Instructions for Activity 1). Ask the students what they notice about the materials on the table.
- Ask the students to sort the materials into categories. Ask the students to think about one way that they might be able to put the materials into categories. Have the students write their categories on a piece of paper and make a list of what would fit into each of their categories. Allow about 2–3 minutes for this step. Students can work individually or in pairs. Possible categories might include:
- Edible vs. non-edible materials
- Living vs. nonliving (previously living)
- Growing vs. not growing (currently)
- Color
- Vegetable vs. fruit
- Tree vs. non-tree
- Parts of the plant (leaves vs. roots, for example)
- Propose to the class that it might be good to think more about sorting by growing vs. not currently growing. Ask, “What parts of a plant are necessary for a plant to grow?” (roots, stems, and leaves)
- Continue the discussion by asking the students to make a list of what a plant needs to be able to grow. Record the student responses on the board or chart paper. If the students have trouble getting started with this list, start off by asking if plants need light to grow. This should spark other ideas to add to the list.
- Write the word “environment” on the board or chart paper. Explain to the students that environment is a word that describes all the living and nonliving things surrounding an organism. Would the items listed in procedure 4 be part of a plant’s environment? Clarify that a plant's environment includes soil, air, light, water, appropriate temperatures, and other plants, animals, and insects living around or on the plant. Some elements in the environment are required for plants to grow. For example, plants require water and light for growth. Other objects are in the environment but may not be required. For example, plants don’t always require the animals and insects that normally live in their environment to grow.
- Continue the discussion by asking students, “What happens if plants don’t have what they need to grow?” Follow with “What do you think would happen if they don’t have the right amounts of what they need?

Activity 2: Growing a Garden
- Ask the students where the food they eat comes from. After getting responses from several volunteers, follow this up by asking if anyone grows some of their own food.
- Inform the students that they will start growing some plants to investigate how they grow and what makes them grow best.
- Provide each student with a copy of Master 1.1. Give each student a few seeds to examine. Ask students to draw a picture of their seed in the appropriate space and to write a few words to describe the appearance of the seeds.
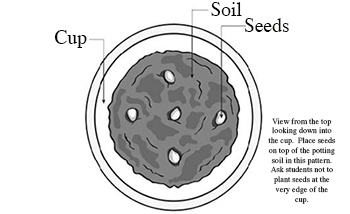
- Provide each student with cups (with drainage holes) and potting soil. Model for the students how to plant their seeds. Point out that the cups have holes in the bottom so extra water can drain out. Fill the cup half full with potting soil, and moisten the soil with the water spray bottle. Place five seeds on top of the soil. Draw the pattern for arranging the seeds on the board or chart paper. Put a thin layer, about 1/4–1/2" (.635-1.27 cm) of soil on top of the seeds. Use the spray bottle to moisten the top layer of soil.

- After the students plant their seeds, have them complete Part 2 of Master 1.1.
- Over the next several days, allow students time to water, observe their seedlings, and record their data on Master 1.1.
- In the space provided on Master 1.1, ask the students to draw pictures of their seed when it is first sprouting and then the seedling when it is about one week old.
- If the students planted different seeds, have them compare the different kinds of seedlings. Ask them if they see differences in leaf shape, leaf size, color of stems or leaves, and so forth.
- If each student planted the same type of seed in one cup, you can pool the data for one kind of seed from the entire class for analysis. Begin by collecting the data from each student on Master 1.2. Then, use the data to construct a bar graph using a template similar to the one that follows.
 Discuss the data with the class to make conclusions about the time needed for seeds to sprout. The data should reveal that the seeds germinated over a range of days. Even though they were all the same type of seed, there were differences in the time it took for the seeds to sprout. It is also likely that some seeds didn’t sprout at all; perhaps those seeds got damaged in some way or they weren’t healthy. Just as in humans and all other species, there are differences between individuals. Guide the discussion using questions such as:
- When did the first seeds sprout?
- On what day did the greatest number of seeds sprout?
- Did all seeds sprout on the same day?
- Did all seeds sprout?
- Why do you think some seeds didn’t sprout?
- Why do you think seeds sprouted at different times?
 Ask students to draw some conclusions based on what they have learned from the seed growing activity. Some possible conclusions are:
- Some kinds of seeds sprout more quickly than others.
- Some seeds may not sprout at all.
- Different seedlings look different than others in their size, shape of leaves, color, and so forth.
- If you have more than one seed of the same kind, you can see differences between individuals (e.g., time to germinate or size may be different among individuals).
Elaborate
Read Issue 6 of Ag Today titled Plants & Animals...Providing Food, Fiber, and Energy! This reader can be printed or accessed digitally. Explore the facts about the renewable and non-renewable resources that make the products and byproducts we need for survival. Learn how agriculture provides energy through biofuels and hydropower, fiber through cotton and wool, and various food products from plants and animals that have been improved through biotechnology and crossbreeding.
Evaluate
After conducting these activities, review and summarize the following key concepts:
- There are many types of plants. Some are grown for their food such as grains, vegetables, and fruits. Other plants are grown for shade (tree) or as part of a landscape (flowers).
- Fruits and vegetables can be grown in small family gardens or on large farms. They provide healthy food for our diets.
Acknowledgements
- BSCS-Biological Science Curriculum Study
- Reviewed by Smithsonian Institution
Recommended Companion Resources
- 4R Reader
- A Seed is the Start
- Ag Today
- Amazing Plant Powers: How Plants Fly, Fight, Hide, Hunt, & Change the World
- Build Your Own GrowLite
- Edible Gardening: Growing Your Own Vegetables, Fruits, and More
- Every Little Seed
- Garden Planner
- Gwendolyn's Pet Garden
- How Things Grow
- Is There Ever Too Much of a Good Thing?
- Kids' Container Gardening
- Lily's Garden
- Oliver's Vegetables
- Pick, Pull, Snap! Where Once a Flower Bloomed
- Plant Secrets
- Rooftop Garden
- SOIL Reader
- School Gardens: A Guide for Gardening and Plant Science
- Soil Health Education Resources
- Sweetpotato Ag Mag
- The Amazing Life Cycle of Plants
- The Soil in Jackie's Garden
- The Story of Seeds
- The Ultimate Guide to Gardening: Grow Your Own Indoor, Vegetable, Fairy, and Other Great Gardens
- What Do Plants Need to Grow?